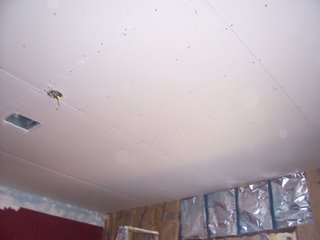
We've been slowly recreating Rachel's room after gutting it. Doug has been insulating and his new best friend is "Great Stuff," that expanding foam insulation. He has filled every single little gap he can find with the stuff.
I think he has used about 10 cans in her room but I don't believe that we will have to worry about drafts. He is putting up R-13 fiberglass batting in the stud bays. After filling the stud bays with batting he will be putting up a plastic vapor barriar because there isn't any on the outside.
He is also going to blow insulation into the walls of the room below (the living room) while these walls are still open. In a few years we will be ripping those walls out and putting in batting but for the few years until then, he wants some semblance of insulation in the walls.
On Saturday, Doug and one of our elders, Bill, were able to get the sheetrock for the ceiling up and start to make it look like a room again. They rented a sheetrock lift which is the only way to go for putting sheetrock on a ceiling. It's starting to look great!
About Me
Monday, August 28, 2006
Thursday, August 17, 2006
Down to bare walls
We have finished getting all the lath and plaster and acoustical tiles out of Rachel's room and out of the house. Doug carried the last of it to the alley for the garbage men to pick up. They are great about picking up anything we put out here. They even came in our yard with Doug and helped him carry some very heavy bags out. Quite a change from our garbage men in Wisconsin.
One of our elders (we have the best elders here) came over last night and worked for several hours with Doug. He pulled all the staples out of the furring on the ceiling so that we will be ready to sheetrock the ceiling. He took down the trim around the second window, helped Doug with some of the electrical work he was doing and helped clean up. Doug put a light in Rachel's closet and worked on some of the electrical outlets. On the two remaining walls, there is a little bit of the wallpaper border to remove. Then it's insulation and sheetrock! Yeah!
This photo is looking down in the stud bays from Rachel's room to the first floor. Obviously, we have balloon framing and there was never anything put in the bays to stop movement of air, and thus potentially fire, between the floors. We will have to correct that before we insulate.
I know I said that we were going to complete the small projects on the list I made before we started another major project. Obviously, we didn't do that but we are still whittling away at the list. We did get a bedframe for our bed so our list of small projects is down to:
1) Move the phone cords in kitchen
2) Repair the hole in the kitchen ceiling
3) Repair the hole in the bedroom ceiling
8) Reassemble the kitchen ceiling fan
9) Put in the glass for guest room French door
12) Patch the hole in the sunroom wall
17) Hang up a miniblind in David’s room
Not bad! It was originally 18 projects down to 7. We have the glass for the guest room door so it's just a matter now of Doug finding time to put it in.
Wednesday, August 16, 2006
We don't need no stinkin' insulation
We told Rachel that we would redecorate her bedroom for her birthday. She thought that meant a new bedspread and some paint. Little did she know! We have now removed all the lath and plaster from her walls and the acoustical panels (yuck, yuck, yuck!) from her ceiling. Her room started like this.
It was a dark maroon with a border around the top that had a baseball theme. It had kind of filmy, dark maroon curtains. The carpet is a browny-orange.
Since we started the remodel, her room looks like this.
Walls:
The amount of insulation you see is the amount of insulation we have. In other words, absolutely none. Not one tiny iota of insulation. Therefore, we are now the proud owners of seven rolls of insulation all primed to go into these walls. We also bought several great cans of Great Stuff to fill the huge amounts of gaps in the walls. The construction looks very solid and straight so that is nice to see but I can't wait to see what insulation is going to do to the temperature and noise in her room.
Ceiling:
We will be drywalling the walls and ceiling. The ceiling was dropped just enough to run the electrical wires. They could have easily been run through the attic but they chose to fur down the ceiling enough to run them and then put up the cardboard acoustical panels. They ruined the plaster ceiling in the process. We would much prefer to have kept and repaired the plaster. The complete lack of insulation and the ruined ceiling made that impossible.
Tuesday, August 08, 2006
How's that list coming?
I posted a list of the small things we would like to accomplish before we start on another big project. Here's the list again.
1) Move the phone cords in kitchen-NOT DONE
2) Repair the hole in the kitchen ceiling-NOT DONE
3) Repair the hole in the bedroom ceiling-NOT DONE
4) Put in more electrical outlets for office-DONE! These may not seem like a big deal until you've lived in an old house where there was only one outlet per room.
5) Put up the face plates in guest room-DONE!
6) Run the electrical to air conditioner-DONE! We had had a extension cord running from the attic to the outlet in Rachel's room to run the pump on the air conditioner.
7) Put in the plexiglass panel for screen door-DONE!
8) Reassemble the kitchen ceiling fan-NOT DONE
9) Put in the glass for guest room French door-NOT DONE
10) Get a screen panel for the back screen door-DONE!
11) Shave off the door of the sunroom-DONE!
12) Patch the hole in the sunroom wall-NOT DONE
13) Put a longer coaxial cord on the tivos so we can move them-DONE!
14) Assemble David’s bed-DONE!
15) Build a bed frame for our bed-NOT DONE
16) Get the dining room table and other furniture out of storage-DONE!
17) Hang up a miniblind in David’s room-NOT DONE
18) Cover the french doors in Rachel's room-DONE!
Friday, August 04, 2006
Doorknobs, anyone?
We are back from our trip to Colorado. We got lost in northern Utah which wasn't a state we had actually planned on visiting. Anyway, we're back, we're done with our week of VBS and ready to settle down to a school routine.
One of the things I have found interesting in this house are the doorknobs. The doorknobs are fairly flat in front and these almost all have those fancy things behind them which may be called escutchions. Anyway, except for our blatently new doors, all the doors have one of these ornate things. Mostly of them look like this, just a little scrollwork at the top. Because these are the most prevelant, I think they must have been the originals.
The second most common set up is this...I think that this was the cheaper replacement used when the originals had to be replaced for whatever reason.
Here are the other types to be found in our house.
Well, there is more than you ever wanted to know about the doorknobs in our house!
Subscribe to:
Posts (Atom)